
들어가기
본 핸즈온(튜토리얼)은 Shiny를 이해하려는 대상의 OJT를 염두로 작성되었습니다. 초심자 대상이기 때문에, Shiny의 ABC만 다룹니다. 그 이상의 학습을 원하는 분들은 Resouces 페이지를 참고하십시요.학습 내용은 Shiny in seven lessons ( https://shiny.rstudio.com/tutorial/ ) 을 참조하여 작성하였습니다.
Shiny 아키텍처
UI와 Server의 상호작용
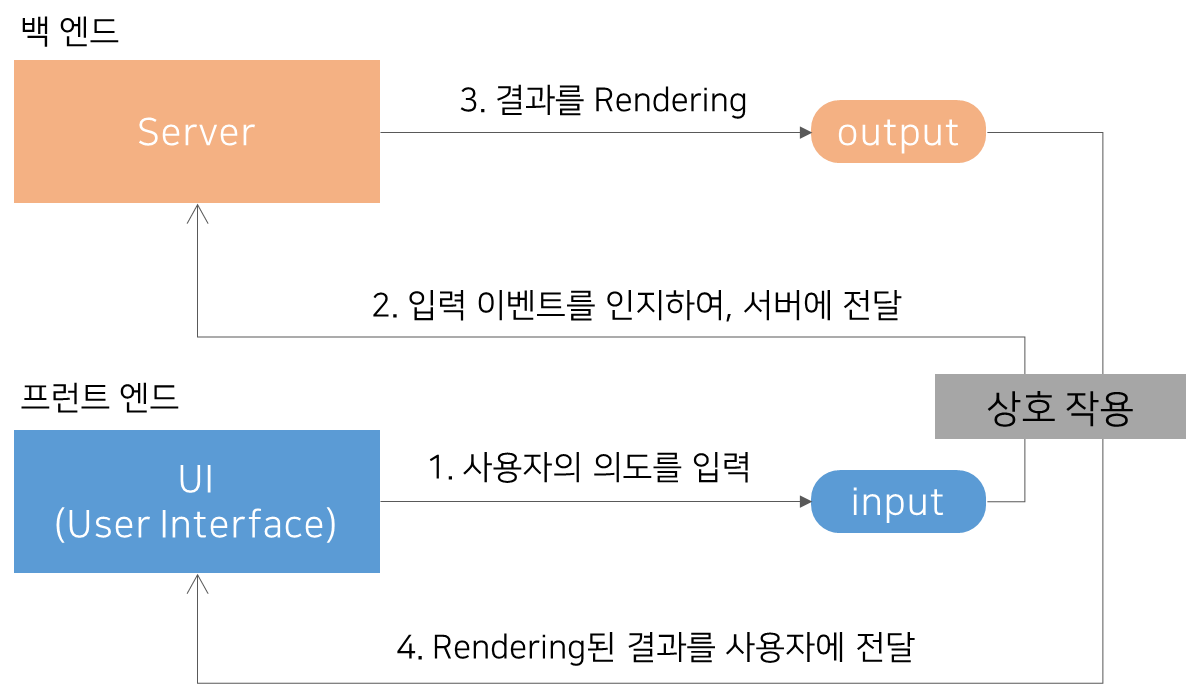
- UI : 사용자 인터페이스(User Interface) 영역으로 입력 위젯(input widget)을 통해 사용자가 의도하는 파라미터(인수)를 server에 전달합니다.
- server : 입력 위젯의 변화를 감지하여, 미리 정의된 작업을 수행한 후 그 결과를 출력 위젯(output widget)에 렌더링하여(rendering) 사용자에게 전달합니다.
UI와 server의 상호작용 예시
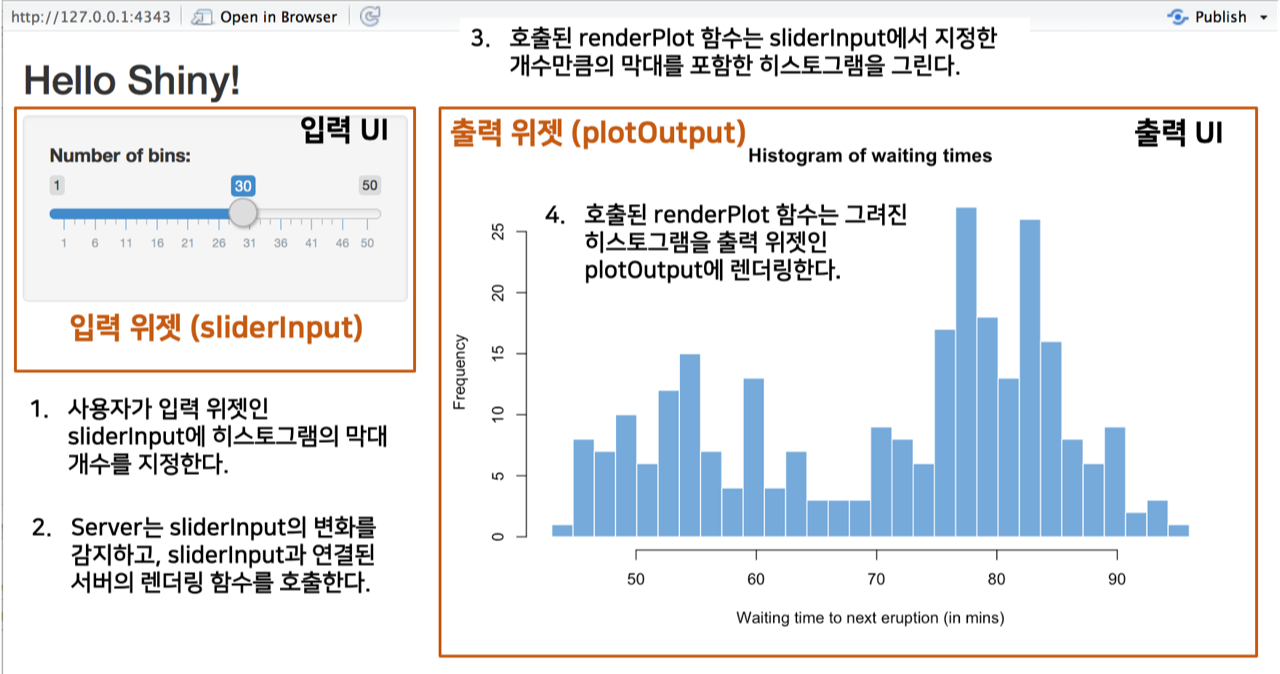
- sliderInput 위젯은 사용자 입력을 기다리고,
- 입력 위젯(input widget)은 사용자의 입력을 대기
- 입력을 인지한 후, sliderInput 위젯과 연결된 renderPlot() 함수를 호출
- 위젯이 변경되면 변경된 위젯이 포함된 렌더링 함수가 자동 호출됩니다.
- renderPlot() 함수는 sliderInput 위젯 값만큼의 막대가 포함된
히스토그램을 그리고,
- 렌더링 함수가 실행됩니다.
- 히스토그램은 출력 위젯(Output widget)인 plotOutput에
렌더링(그려짐)됩니다.
- 출력 위젯에 렌더링된 결과가 반영됩니다.
UI와 server의 상호작용 표준화
UI와 server의 상호작용을 shiny 스크립트 관점에서 표준화해 봅니다.
- 위젯들은 개별 위젯을 인식하도록 아이디를 부여해야 합니다.
- 입력 위젯은 inputId,
- 출력 위젯은 outputId
- 입력 위젯의 이름은 “기능명 + Input” 포맷으로
정의됩니다.
- sliderInput = slider + Input,
- 즉, 슬라이더로 사용자 입력을 받아서 서버로 전달하는 위젯
- 출력 위젯의 이름은 “기능명 + Output” 포맷으로
정의됩니다.
- plotOutput = plot + Output,
- 즉, 시각화된 R 플롯을 출력하는 위젯
- 렌더링 함수 이름은 “render + 기능명” 포맷으로
정의됩니다.
- renderPlot = render + Plot,
- 즉, 플롯으로 렌더링하는(플롯을 그리는) 함수
Shiny 첫 예제
히스토그램 그리기 예제
UI와 Server의 상호작용 예시를 구현한 shiny 프로그램은 다음과 같습니다.
눈으로 한번 쭉 훑어보세요. 이해할 것 같으면서도 어려운 겁니다.
library(shiny)

# Define UI for application that draws a histogram
ui <- fluidPage(

    # Application title
    titlePanel("Old Faithful Geyser Data"),

    # Sidebar with a slider input for number of bins
    sidebarLayout(
        sidebarPanel(
            sliderInput("bins",
                        "Number of bins:",
                        min = 1,
                        max = 50,
                        value = 30)
        ),

        # Show a plot of the generated distribution
        mainPanel(
           plotOutput("distPlot")
        )
    )
)

# Define server logic required to draw a histogram
server <- function(input, output) {

    output$distPlot <- renderPlot({
        # generate bins based on input$bins from ui.R
        x    <- faithful[, 2]
        bins <- seq(min(x), max(x), length.out = input$bins + 1)

        # draw the histogram with the specified number of bins
        hist(x, breaks = bins, col = 'darkgray', border = 'white')
    })
}

# Run the application
shinyApp(ui = ui, server = server)
예제 실행해 보기
아키텍처를 이해하려는 목적으로 결과를 보고 프로그램도 살펴 보세요.
shiny::runExample("01_hello")
tutorial
Shiny 공식 tutorial 페이지
Shiny 공식 tutorial 페이지를 살펴보고, 앱을 실행시키는 방법을 숙지하세요.
https://shiny.rstudio.com/tutorial/written-tutorial/lesson1/